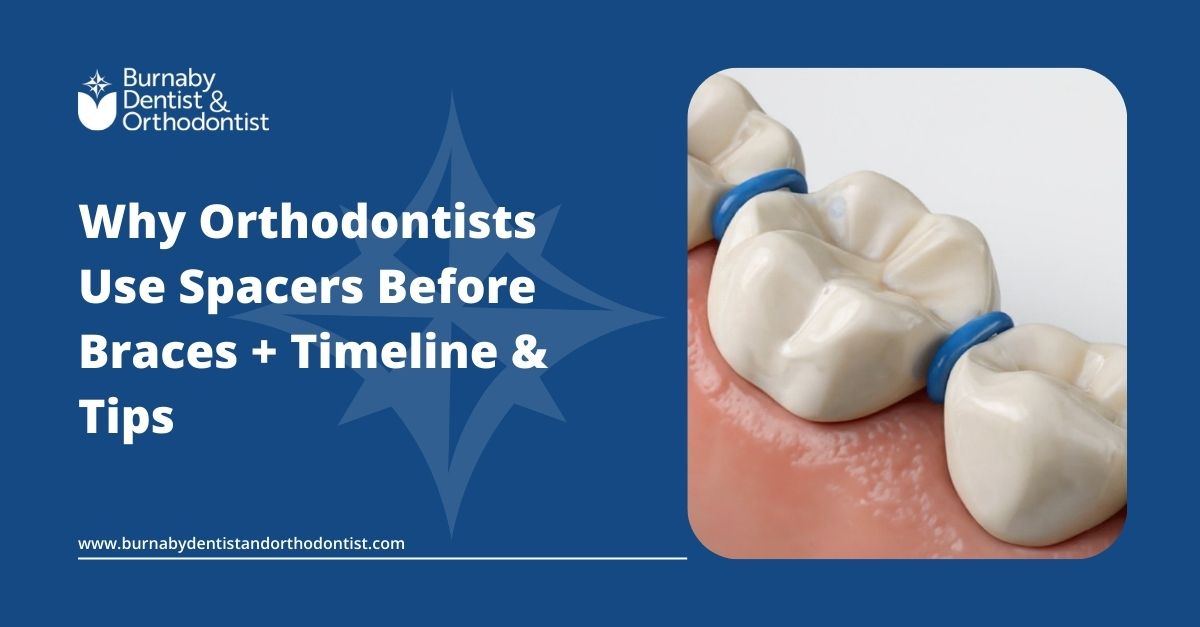
Starting orthodontic treatment often comes with a surprise—your first appointment might not include brackets or wires, but small rings placed between your back teeth.
These are orthodontic separators (also called spacers), and while they’re easy to overlook, they play a key role in making sure your braces fit properly and comfortably. Many patients—and parents—don’t expect them, and even fewer understand what they actually do.
This guide explains what orthodontic spacers are, when they’re needed, how they feel, and what comes next—so you can feel confident and prepared.
At a Glance:
Orthodontic separators (or spacers) are small rubber or metal rings placed between back teeth before braces. They create space for molar bands that support your braces. Not everyone needs them, but when used, they typically stay in for about a week. Mild pressure is normal—sharp pain or early loss isn’t. Proper care helps avoid delays, discomfort, or complications before your braces go on.

What are orthodontic separators—and why are they used?
Orthodontic separators, also called spacers, are small rubber or metal rings placed between your back teeth before braces are applied. Their job is to gently create space between molars so that orthodontic bands—metal rings that anchor parts of your braces—can fit comfortably.
Without this step, placing bands can be difficult or painful, especially if your teeth are tightly aligned.
Spacers work over a few days by nudging teeth slightly apart. While they may seem minor, they help prevent discomfort later and allow the rest of your orthodontic treatment to begin more smoothly.
As best dentist in burnaby bc, we use spacers only when necessary, and we’ll always walk you through why they’re being used and what to expect next.
Rubber vs. Metal Spacers: What’s the Difference?
Orthodontic spacers come in two main types—rubber and metal. The one your orthodontist chooses depends on how tightly your teeth are aligned and how much space is needed.
Here’s a quick comparison:
| Rubber vs. Metal Spacers: Quick Comparison | ||
| Feature | Rubber Spacers | Metal Spacer |
| Material | Elastic Rubber | Stainless Steel |
| Flexibility | Soft and Stretchable | Rigid, Spring-Like |
| Best for | Mild to Moderate Spacing Needs | Tight Contacts or More Resistant Teeth |
| Comfort Level | Generally More Comfortable | Slightly Firmer Feel |
| Duration | Typically Worn for About a Week | Same as Rubber, Varies Case by Case |
Rubber spacers are more common—they’re flexible, easier to place, and usually enough for most patients. Metal spacers are used when extra resistance is needed or when teeth are particularly close together.
No matter which type is used, both are safe, temporary, and customized to your specific treatment plan. If you’re not sure what to expect, just ask—our Burnaby team is happy to walk you through it.
Does everyone need spacers before braces?
Not all patients need spacers—and that’s perfectly normal.
On the other hand, if you’re receiving clear aligners, self-ligating braces, or other systems that don’t use molar bands, you likely won’t need spacers at all.
If you’re considering clear aligners instead of traditional braces, you can learn more about our Invisalign treatment in Burnaby and whether they may be a better fit for your orthodontic goals.
Spacers are only used when there isn’t enough natural space between your back molars to place metal bands comfortably. These bands are part of some traditional braces systems and act as anchors to help guide tooth movement.
You may need spacers if:
- Your molars are tightly aligned and need gentle separation before banding
- You’re getting metal braces that include molar bands
- You haven’t had orthodontic treatment before and your teeth have naturally shifted closer over time
On the other hand, if you’re receiving clear aligners, self-ligating braces, or other systems that don’t use molar bands, you likely won’t need spacers at all.
At Burnaby Dentist and Orthodontist, we’ll let you know in advance if they’re part of your plan—and why.

What to Expect During Spacer Placement
Getting spacers is a simple, in-office step that takes just a few minutes—and no needles or numbing are needed.
Here’s what typically happens:
- Your orthodontist stretches each spacer using a small tool.
- The spacer is gently placed between two molars at the back of your mouth.
- You’ll feel some tight pressure as the spacer settles in—that’s normal.
The entire process is quick, and while the sensation may feel strange or snug, it shouldn’t be painful. Most patients describe the feeling as pressure, similar to something stuck between their teeth.
At Burnaby Dentist and Orthodontist, we explain each step before we begin so you feel fully prepared. If you’re nervous, we’re here to walk you through it calmly and carefully.
How long do spacers stay in—and what if one falls out?
Most patients wear spacers for about one week, though some may need them for a few extra days. The timing depends on how quickly your teeth respond and how much space is needed before placing molar bands.
It’s not uncommon for a spacer to fall out on its own—especially if enough space has already formed. If that happens, stay calm and avoid trying to fix it yourself.
Instead:
- Call our office so we can assess if it needs to be replaced
- Avoid chewing on that side or poking the area
- Rinse gently with warm salt water if the area feels tender
In many cases, the spacer has already done its job and won’t need to be reinserted. We’ll let you know what’s best for your specific case.

Tips to Stay Comfortable With Spacers
Feeling a bit of pressure or soreness after spacers go in? That’s completely normal—and temporary. These tips can help you stay comfortable while your teeth adjust:
✔ Eat Soft, Easy-to-Chew Foods: Stick with foods like scrambled eggs, yoghurt, pasta, and smoothies. Avoid anything crunchy, sticky, or chewy—those can worsen soreness or loosen the spacer.
✔ Use Over-the-Counter Pain Relief: If needed, take a mild pain reliever such as acetaminophen or ibuprofen. Be sure to follow dosage instructions and avoid aspirin for children or teens.
✔ Skip Flossing Around Spacers: You can brush and floss the rest of your teeth as usual, but avoid the areas with spacers. Flossing between those teeth can pull the spacer out or irritate your gums.
✔ Don’t Pick at Them: It’s tempting to touch spacers with your tongue or fingers, especially when they feel new. Try to avoid this—it can loosen or dislodge them.
✔ Ask for Orthodontic Wax: If a spacer causes rubbing or irritation, we can provide wax to soften the area and prevent discomfort.
These small adjustments help your treatment stay on track—without unnecessary pain or delays.

How to Brush and Floss Your Teeth with Spacers
Keeping your teeth clean while wearing spacers is important—but it doesn’t need to be complicated.
Here’s how to keep up your routine without disturbing the spacers:
Brush Gently, Twice a Day
Use a soft-bristled toothbrush and fluoride toothpaste. Brush all surfaces of your teeth, but avoid scrubbing near the spacers. A gentle sweep around the area is enough.
Skip Floss Between Spacer Teeth
You can floss the rest of your mouth as usual—just don’t try to thread floss between the teeth holding spacers. That space is deliberately tight, and flossing there can dislodge the ring.
Try a Water Flosser or Interdental Brush
For added cleanliness, use a water flosser or small interdental brush to gently clean around your molars without touching the spacers directly.
Rinse After Meals
A quick swish with water or alcohol-free mouthwash helps remove food particles and reduce irritation.
If anything feels sore or tricky to manage, we’re always here to guide you through it. The goal is to stay clean and comfortable while your treatment progresses.

What Comes Next: After Spacers, Before Braces
Once your spacers have done their job, we’ll remove them and begin the next phase of your orthodontic treatment—usually braces followed by orthodontic retainers that keep your new smile stable long-term.
Here’s what usually happens next:
1. Placement of Molar Bands
If you’re getting traditional braces, metal bands will be gently placed around your back molars. Thanks to the space created by the spacers, this step is usually quick and comfortable.
2. Final Comfort Check
We make sure everything feels right before moving forward. If there’s any gum sensitivity or pressure, we’ll address it on the spot.
3. Your Braces or Aligner Fitting
Most patients begin braces at the same visit. If you’re getting clear aligners, this is when we take your final digital scan to ensure a snug, accurate fit.
At Burnaby Dentist and Orthodontist, we guide you through every step—no surprises, no confusion. When you’re ready, we’re ready.

Why choose Burnaby Dentist for orthodontic care?
Choosing the right orthodontic provider means finding a team that prioritizes comfort, customization, and real results. At Burnaby Dentist and Orthodontist, we deliver that—every step of the way.
Here’s what makes us a trusted choice in Burnaby:
✅ Digital Scans and 3D Planning: We use advanced tools to map your teeth with precision—no messy impressions, just accurate data for a better fit and faster progress.
✅ Expert, Gentle Care: From placing spacers to adjusting aligners, your treatment is handled with experience and a focus on comfort.
✅ Flexible Scheduling: Convenient appointment options for busy students, professionals, and families across Burnaby and nearby areas.
✅ Treatment for All Ages: We support teens, adults, and families in our family dental centre in Burnaby with care tailored to your goals. If your orthodontics are part of a cosmetic dentistry plan, we focus on results that improve both function and appearance.
✅ Clear Communication: We walk you through each phase so you know what’s happening, what’s next, and how to stay on track.
Start with a consultation, and we’ll build the rest—one well-planned step at a time.
Conclusion
Orthodontic separators may be small, but they play a big role in setting your treatment up for success. By creating the space your braces need, they make future steps easier, more comfortable, and more effective.
At Burnaby Dentist and Orthodontist, we make sure every stage—from your first spacer to your final adjustment—is clearly explained and carefully planned. Whether you’re starting braces or preparing your child for treatment, we’re here to guide you with expert care and practical support.
Do spacers hurt?

You may feel some pressure or mild soreness, especially in the first 24–48 hours. That’s normal and typically fades quickly.
Can I eat normally with spacers in?
Stick to soft, easy-to-chew foods. Avoid sticky, crunchy, or chewy items that could loosen or irritate the spacers.
What happens if a spacer falls out early?
Call us. It may not need replacing if enough space has formed, but we’ll check and guide you on the next step.
What’s the next step after spacers?
Once the space is ready, we place molar bands and begin your braces or aligner fitting—often at the same appointment.
Do all patients need spacers before braces?
No. Spacers are only used if molar bands are part of your treatment plan. If you’re getting aligners, they may not be needed at all.